I’m a new brand. Here’s how I start custom brand packaging without wasting money—strategy, materials, dielines, sampling, costs, and suppliers.
When I first started building my brand, “custom packaging” felt like a giant decision with a hundred hidden costs. I wanted something that looked premium, shipped safely, and didn’t destroy my cash flow.
So I built a simple process I still follow today. If you’re a new brand (especially eCommerce/DTC), this is the most practical way I know to start customizing your brand packaging—one step at a time.
Step 1: I define what packaging must do (before I design anything)
Before colors and finishes, I answer three questions:
- Where will customers meet my product?
Online shipping box? Retail shelf? Gift? Subscription? - What must packaging protect against?
Drops, crushing, moisture, heat, leakage, vibration, tampering. - What’s the one feeling I want at unboxing?
“Clean and clinical,” “handmade,” “luxury gift,” “fun and bold,” etc.
This matters because unboxing isn’t just aesthetics—packaging influences loyalty and brand choice. For example, Pro Carton’s EU consumer research summary reports 41% of people said they chose a brand specifically for the packaging used. Pro Carton
Step 2: I write a “packaging brief” (my non-negotiables)
This single page prevents endless back-and-forth with designers and suppliers.
My packaging brief template
- Product size + weight (include the “largest possible” version)
- Fragility (glass? powder? liquid? sharp corners?)
- Sales channel (eCommerce, retail, wholesale, Amazon, pop-ups)
- Target unboxing vibe (3 adjectives + 3 reference photos)
- Budget range (per unit, including inserts if needed)
- Initial quantity + growth plan (e.g., 500 now, 2,000 next run)
- Sustainability goals (recyclable, FSC, plastic-free, etc.)
- Compliance needs (barcode, batch/lot area, warnings, language, etc.)
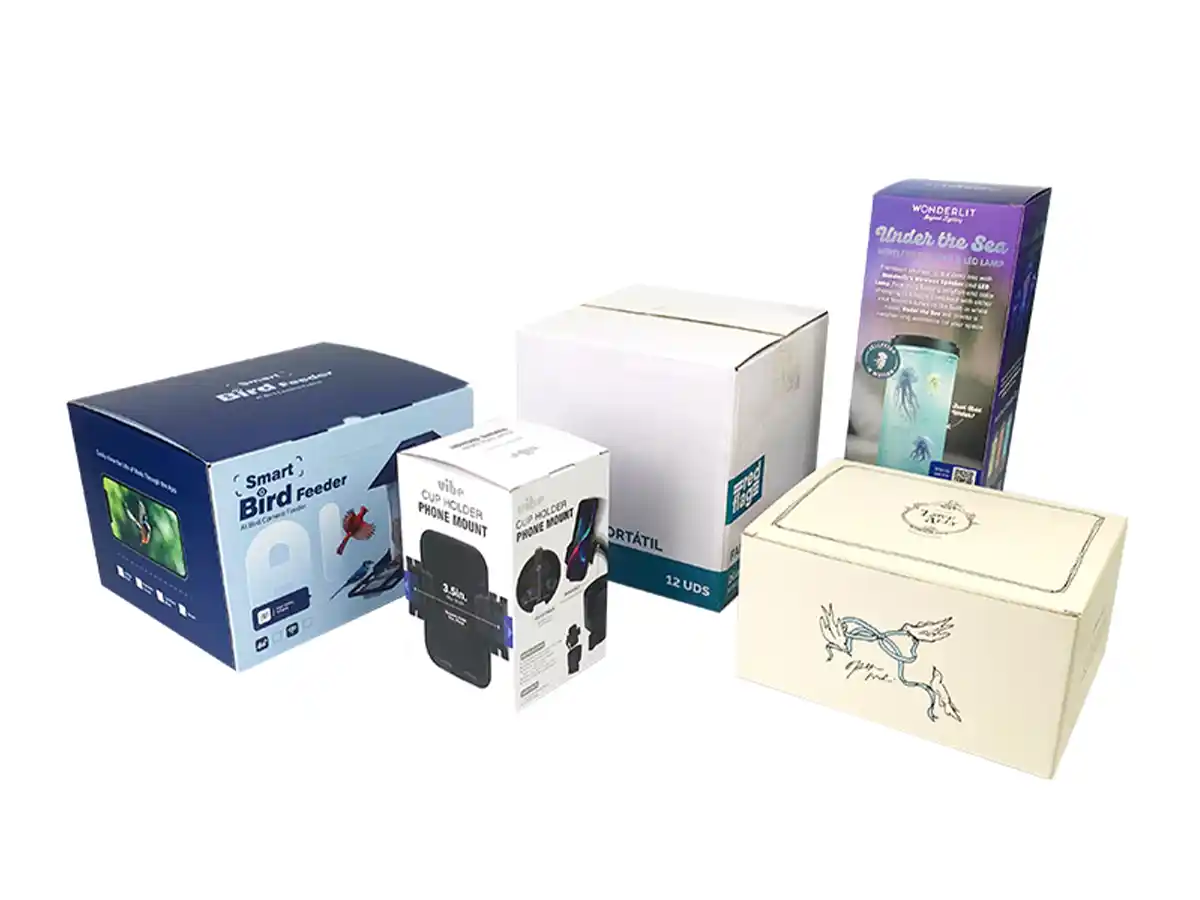
Step 3: I choose the right packaging “system” (not just a box)
A startup mistake I see a lot: designing a beautiful product box… then realizing it doesn’t survive shipping.
I think in layers:
- Primary packaging (touches product: pouch, inner wrap, tray)
- Product box (folding carton or rigid box)
- Shipping packaging (mailer/corrugated + void fill)
- Brand extras (thank-you card, insert, sticker, tissue)
If I sell online, I often start with a branded mailer box + simple insert, then upgrade the inner packaging later.
Step 4: I pick a structure that matches my stage (and my budget)
Here’s how I decide quickly:
If I’m eCommerce-first
- Corrugated mailer boxes (strong, ships well, great for branding)
- Kraft mailers when I want a natural, eco-forward look
If I’m retail-first
- Folding cartons (clean shelf look, cost-efficient)
- Add a hang tab only if the retailer needs it
If my product is premium/giftable
- Rigid gift boxes (strong, high perceived value)
- Use inserts only when protection/presentation demands it
A practical reality: many paper packaging factories quote best when quantities start in the few hundreds (often ~300–500 pcs for certain styles), with lead times commonly around 8–15 business days for standard production, depending on complexity. SLD Packing+1
(That’s why I try to design something that looks intentional even at lower MOQs.)
Step 5: I choose materials like a grown-up (simple rules that work)
I don’t start with “What’s the fanciest paper?” I start with “What will this go through?”
Common paper packaging materials (plain English)
- Paperboard (folding cartons): clean printing, great for retail boxes
- Corrugated cardboard: best for shipping strength (mailers, shipper boxes)
- Kraft paper: natural look, often used for eco positioning
- Rigid board (chipboard + wrap paper): premium gift boxes
My sustainability reality check
Customers say they care, and many do—but willingness to pay varies by market and income.
- PwC reported consumers are willing to pay an average ~9.7% more for sustainably produced/sourced goods (survey-based). PwC
- Shorr’s 2025 consumer report says 43% are willing to pay extra for sustainable packaging (also survey-based). Shorr Packaging
- McKinsey’s 2025 packaging research shows willingness to pay “a lot more” can be much lower in some segments, and can vary sharply by country and demographic. McKinsey & Company
- McKinsey-related coverage notes consumers often rank recyclability as a top packaging sustainability attribute.
So my rule is: make it easy to recycle first, then add “eco” messaging only if I can back it up.
If I want a safer “recyclable-by-default” direction
- Prefer paper-based mono-material designs
- Avoid unnecessary mixed materials (paper + plastic windows + heavy lamination)
- Use coatings/finishes carefully (choose what’s needed, not everything)
If I want to use an external sustainability claim like FSC, I confirm the supplier can support chain-of-custody requirements. FSC explains that the label signals materials meet chain-of-custody requirements across the supply chain.
Step 6: I design for printing (so the result matches the screen)
This is where new brands lose money: beautiful design files that can’t be produced cleanly.
My must-follow design checklist
- Request the dieline (cut/crease template) from the manufacturer
- Keep text/logos away from folds and edges (build in “safe zones”)
- Add bleed (so backgrounds don’t show white edges)
- Plan where barcodes/labels will go (especially for retail/Amazon)
- Decide early: CMYK (standard full color) vs spot colors (for strict brand color control)
I also avoid making the first version too complicated. Minimal design done well usually beats “busy luxury.”
Step 7: I choose printing + finishes based on ROI, not hype
Finishes are tempting—foil, emboss, spot UV, soft-touch lamination. They can look amazing, but they also add cost, lead time, and sometimes recycling complexity.
What I typically choose for a first run
- Clean printing + one hero finish (not five)
- Example: matte lamination + small foil logo
- Or kraft look + simple black printing
If I’m doing higher-end packaging later, I’ll experiment more.
Step 8: I sample like my business depends on it (because it does)
Sampling is not optional.
My sampling flow:
- White sample (blank structure sample): confirm size, fit, opening feel
- Color proof / print proof: confirm color expectations
- Pre-production sample: confirm final materials + finishes + assembly
Then I do basic tests:
- Shake test (does product rattle?)
- Drop test (typical handling)
- Scuff test (does the surface scratch easily?)
Step 9: I control costs with 6 levers (instead of arguing over pennies)
If the quote is too high, I don’t panic—I adjust levers:
- Size optimization: smaller boxes reduce material + shipping cost
- Standard structures: custom shapes cost more
- Ink coverage: heavy solid coverage can increase cost/risk
- Finish selection: each finish adds steps
- Insert complexity: molded/precision inserts cost more than folded paper inserts
- Quantity strategy: plan runs so I’m not constantly paying “setup costs” again
Step 10: I keep an eye on regulations (especially if I sell internationally)
If I sell into the EU (or plan to), I pay attention to evolving packaging rules. The European Commission notes the Packaging and Packaging Waste Regulation (PPWR) entered into force on 11 February 2025, with a general date of application 18 months after that. Environment
(That points to broad application around August 2026, though specific obligations can vary by category and timeline.)
Even if I’m not in the EU, this is a signal of where global packaging expectations are going: less waste, more recyclability, clearer labeling.
Step 11: I vet suppliers with questions that reveal problems early
I don’t start with “Can you make this?” I start with:
My supplier questions
- What’s your MOQ for this exact structure and finish?
- What’s your production timeline and what changes it?
- Can you provide a dieline and file checklist?
- What QC checks do you run (color, dimensions, glue strength)?
- What packaging tests can you support (drop/shipping simulation)?
- If I want FSC, what documentation can you provide?
- Can you show samples similar to my category?
As a reference point, a fully equipped paper packaging manufacturer may run offset presses and finishing equipment (lamination, UV, hot stamping), which can affect what’s feasible and how stable quality is at scale. SLD Packing
My simple 30-day “startup packaging launch” plan
Week 1: Packaging brief + choose structure
Week 2: Dieline + design + cost check
Week 3: White sample + revisions
Week 4: Pre-production sample + final order
If I’m rushing, I still don’t skip sampling—I just simplify the design.
Common mistakes I avoid (because they’re expensive)
- Designing before knowing box structure/dieline
- Buying a luxury rigid box when a mailer + insert would do
- Choosing 3–5 finishes in the first run
- Forgetting where barcodes/labels will go
- Making sustainability claims without documentation
- Underestimating shipping damage and returns (packaging is cheaper than refunds)
FAQ
How many units should I order for my first custom packaging run?
If I’m still validating product-market fit, I keep the first run conservative and choose a structure that can scale. Many suppliers price best once I’m in the hundreds to low thousands, but practical MOQs for certain paper packaging styles can start around a few hundred pieces. SLD Packing+1
What’s the best packaging for a small eCommerce brand?
A corrugated mailer box with brand printing is usually the best balance of protection, unboxing, and cost control.
Do customers really care about sustainable packaging?
They care a lot about recyclability and waste reduction, and many surveys show sustainability can influence purchase decisions—though willingness to pay varies. Shorr Packaging+3McKinsey
What’s the first “premium” upgrade that makes sense?
One thoughtful finish (like subtle foil) or a well-designed insert card can lift perceived value without overcomplicating production.