
Why Paper Shopping Bags Crack at Side Folds and Corners
If a paper shopping bag cracks where the side gusset meets the bottom folds, do not automatically assume the paper is too thin. Paper that is too light for the intended load can tear, stretch, or fail around the handles. But paper that is thick or stiff for the existing crease can fail for the opposite reason: it cannot form a tight fold without the outer surface splitting.
For premium shopping bags with rope or ribbon handles, the real question is not simply, “What is the highest gsm available?” It is whether the paper grade, actual thickness, stiffness, moisture, grain direction, printed finish, and creasing setup work together. A strong flat sheet can still have a weak fold.
As a practical company guideline for this bag category, SLD Packing usually starts at 210–250 gsm. Papers over 250 gsm and up to 300 gsm are mainly considered for unusually large bags or particularly heavy loads; paper above 300 gsm is normally avoided. This range does not apply to restaurant takeaway kraft bags.
First Identify What Is Actually Failing
Buyers often use “burst edge” or “burst corner” for several different defects. The terms are understandable, but the failure pattern matters because each one leads to a different investigation.
| Visible symptom | What may be failing | First checks |
|---|---|---|
| A thin white line on a dark fold, with the sheet still intact | Ink, coating, varnish, or the top paper surface | Print coverage, coating flexibility, curing, fold direction, and crease quality |
| A rough or open split that exposes paper fibers | The paper structure at the crease | Caliper, stiffness, moisture, grain direction, paper grade, and crease setup |
| A clean opening along the side seam | The adhesive bond rather than the fold | Glue choice, application position, curing, and surface compatibility |
| A tear beginning at a handle hole after lifting | The load path through the handle area | Product weight, paper strength, handle patch, hole geometry, and reinforcement |
| A puncture or split shaped by the contents | Local pressure from the packed product | Product fit, sharp edges, gusset depth, bottom size, and protective support |
| A concentrated break where several fold lines meet | A high-strain corner or crease intersection | Crease geometry, folding sequence, registration, paper condition, and material flexibility |
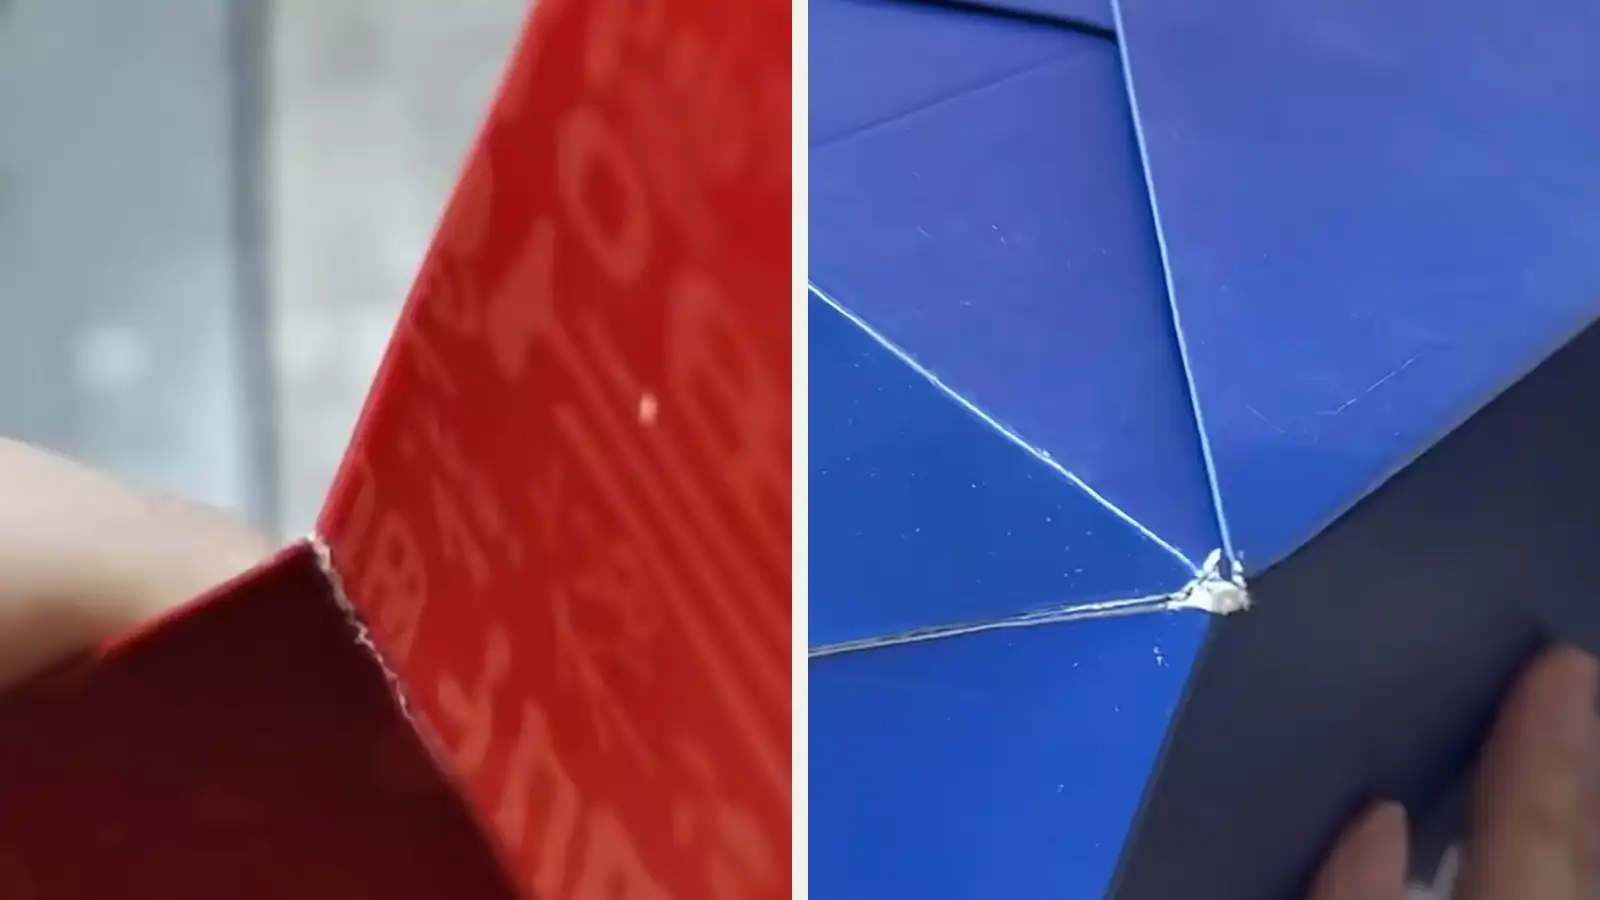
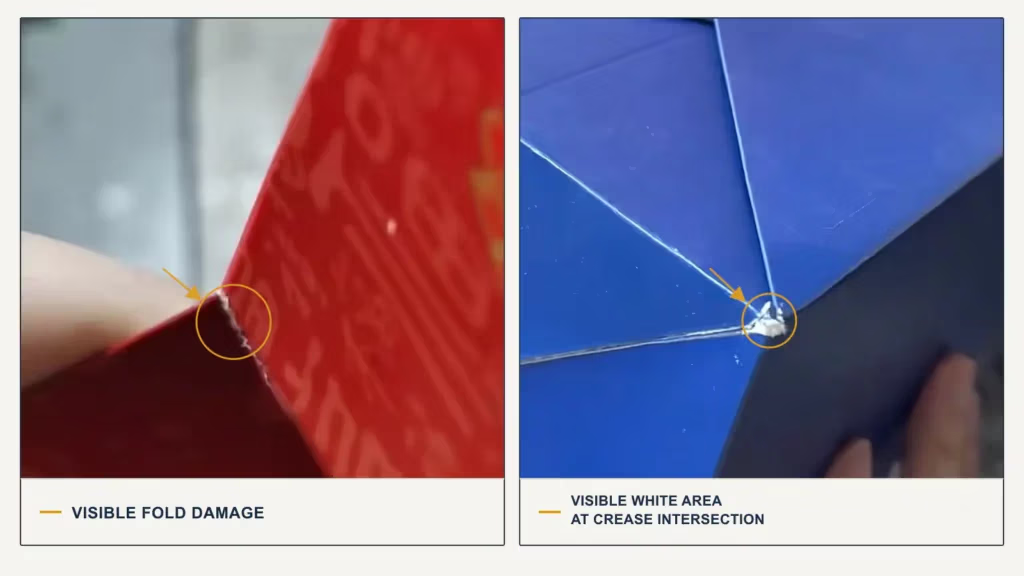
In the supplied examples, the visible damage is concentrated at a fold end and at an intersection of several folds. That makes the crease-and-fold system a sensible place to investigate first. The photographs do not, by themselves, prove that the paper is too thick, too dry, or incorrectly die-cut.
Why Paper That Is Too Thick Can Crack at a Fold
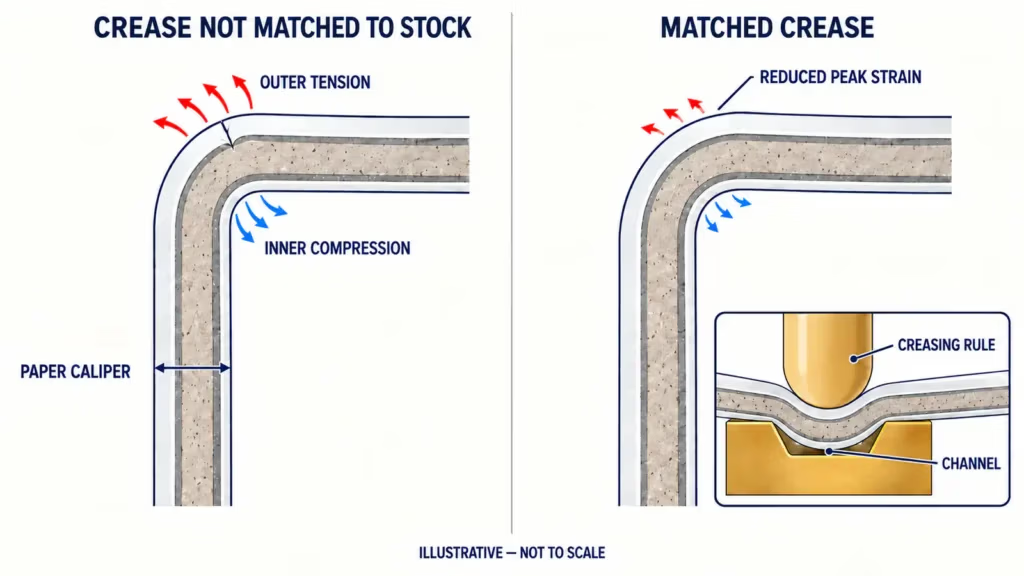
When a sheet is folded, the material on the outside of the bend must travel farther and is placed in tension, while the inside is compressed. As the sheet becomes thicker and more resistant to bending, a sharp fold places more strain on its outer fibers and surface layers. Sappi’s fold-endurance guidance notes that heavier basis weights are more likely to crack at a fold because the fibers on the outside can be pushed beyond their breaking point.
A properly formed crease gives the material somewhere to bend. In multi-ply paperboard, the crease creates controlled internal separation so that the layers can act like a hinge instead of forcing the whole sheet around one sharp line. Holmen’s paperboard creasing and folding guide explains that very thick paperboard may require more than one crease or a different scoring approach.
This is why “thicker paper” is not automatically “better paper.” The paper may feel more substantial on a flat panel yet become less forgiving at the side gusset and bottom corner. Cracking risk rises when the paper’s thickness or stiffness is not matched to the crease geometry, folding sequence, and bag structure.
gsm is not the same as thickness or stiffness
Grammage, commonly stated in gsm, is the mass of one square meter of paper. It does not fully describe the sheet’s caliper, which is its measured thickness, or its stiffness, which is its resistance to bending. Paper density, bulk, fiber composition, coating, and lamination all affect those properties.
Two 300 gsm papers can therefore fold differently. At equal grammage, a high-bulk stock may be thicker than a denser one; coatings or lamination can further change the finished sheet’s stiffness and fold response. Holmen’s explanation of paper bulk gives a simple example of equal-gsm papers having different calipers. A production specification should identify the paper grade and actual caliper, not only a gsm number.
Is 210–250 gsm the Better Range for Rope- and Ribbon-Handle Bags?
For the premium rope-handle and ribbon-handle custom paper shopping bags discussed here, SLD Packing more commonly recommends 210–250 gsm as the practical starting range. Paper above 250 gsm may be considered when the bag is unusually large or must carry a particularly heavy load, but SLD Packing normally does not recommend exceeding 300 gsm. This is a company material-selection guideline, not a universal industry standard, and it does not apply to restaurant takeaway kraft bags made with different papers and constructions.
The final choice still depends on the bag size, gusset depth, expected contents, handle and reinforcement design, paper grade, actual caliper, printing and surface finish, and the folds required by the structure.
| Selection range | When SLD Packing would normally consider it | Main risk to check |
|---|---|---|
| 210–250 gsm | The usual starting range for premium rope- or ribbon-handle shopping bags | Confirm that the selected grade, bag size, product load, handle reinforcement, finish, and crease work together |
| More than 250, up to 300 gsm | Mainly when an unusually large bag or particularly heavy intended load justifies the additional material | Higher caliper and stiffness can make the side and corner folds less forgiving |
| Above 300 gsm | Generally not recommended for this bag category without a compelling project-specific reason | Increased fold resistance and cracking risk; a different paper grade, structure, or reinforcement may be more effective |
Moving from 250 gsm toward 300 gsm may improve one part of a bag and make another part harder to fold. A better paper grade, handle patch, bottom reinforcement, or structural change may sometimes add the required carrying performance without making every fold thicker. Moving down in gsm may reduce fold stress but can also reduce the bag’s load margin.
There is no reliable gsm-to-carrying-capacity shortcut. Although it focuses mainly on high-quality supermarket-style paper carrier bags rather than this premium bag specification, the CEPI Eurokraft and EUROSAC guide considers paper strength, glue, converting, and handle construction together; EN 13590 addresses the volume and carrying capacity of the finished bag. These sources support whole-bag testing, not a universal gsm range.
Other Common Causes of Fold and Corner Cracking
1. The crease does not match the finished material
The creasing rule, channel width and depth, make-ready, alignment, and pressure must suit the paper’s actual caliper and construction. If the crease is too shallow or poorly formed, the sheet bends outside the intended line. If pressure is excessive, the operation can damage fiber bonding before the bag is assembled.
A study in the Journal of Korea TAPPI found that both insufficient and excessive creasing pressure produced poor results in coated board: too little pressure failed to form a usable crease, while excess pressure damaged fiber bonding. The practical correction is therefore not simply “add more pressure” or “reduce pressure.” The converter should run a controlled crease test using the actual printed and finished stock.
Die-cutting and creasing often happen in the same production step, so “too much die-cutting pressure” is a common description. More precisely, the problem may involve the crease rule, counter-die channel, local make-ready, registration, or later folding pressure rather than the cutting knife alone.
2. The paper has become too dry
Paper exchanges moisture with the surrounding air. Low relative humidity, high drying or curing heat, prolonged unwrapped storage, and heated indoor air in winter can reduce flexibility and make the sheet more brittle. This helps explain why the same construction may behave acceptably in one season and crack in another.
Holmen’s paperboard handling guidance recommends 45–60% relative humidity and 20–23°C for its printing and converting environment, and specifically warns that dry, centrally heated conditions can make paperboard brittle and difficult to crease. These figures are useful process guidance, not a universal acceptance limit for every paper. Follow the paper supplier’s storage and conditioning instructions and allow wrapped stock to reach room temperature before opening it.
3. The paper grade or fiber structure lacks the right balance
Fold performance depends on more than nominal strength. Fiber type and length, fillers, coating, internal bonding, tensile strength, and elongation all influence whether a sheet can deform without a visible break. Research on high-grammage paper shows that fold-crack resistance depends on a balance of strength and flexibility, not on maximizing a single property.
This is one reason a change of mill, grade, or batch can matter even when the purchase order still says “250 gsm.” Keep the supplier, paper grade, lot, caliper, and grain direction traceable during sampling and production.
4. The grain direction works against a critical fold
Most paper fibers align preferentially during manufacture, so the sheet behaves differently in the machine and cross directions. On heavier papers, a final fold generally resists cracking better when it runs with the grain. A shopping bag, however, contains vertical gusset folds, horizontal bottom folds, and diagonal corner folds, so not every line can be optimized in isolation.
The dieline, sheet layout, main load path, and most demanding crease intersections should be assessed together. If the layout changes to save paper, the grain direction should be rechecked rather than assumed to be unchanged.
5. Ink, varnish, coating, or lamination can reduce fold tolerance
Dark solid coverage makes exposed light-colored paper especially visible. Heavy ink films and inflexible or over-cured coatings can also reduce fold tolerance. Sappi’s fold-endurance guidance identifies low moisture, heavy coatings, high curing heat, and folds through dark solids as relevant risks.
Lamination is not an automatic cure. A film may bridge or hide a small surface crack, but it also changes the composite sheet’s caliper and bending behavior. Creasing should be set for the fully printed, coated, or laminated material—not for the unfinished base paper.
6. Several folds concentrate stress at one corner
Side-gusset and bottom folds intersect in a small area. Minor errors that are tolerable on a straight crease can combine at this point: the paper may be folded in more than one direction, several layers may stack together, or one crease may end slightly out of register with another. An acute corner, deep gusset, tight folding sequence, or local build-up of coating can increase the strain further.
That is why repeated corner damage should trigger a review of the dieline and forming sequence, not only a change in paper weight.
How to Diagnose a Failed Paper Bag Sample
Use the damaged sample as evidence, but change one variable at a time.
- Record when the crack first appears. Inspect the flat blank, the newly formed bag, the first opening, and the loaded bag. A crack present before loading points to a different mechanism from a tear that starts after the handles are lifted.
- Identify the layer that failed. Under magnification, check whether only the ink or coating has whitened, the paper fibers have opened, the film has lifted, or a glue seam has separated.
- Map every failure. Mark its position and direction on the dieline. Repeated damage at the same crease end suggests a local geometry or registration issue; random damage may point toward material variation or handling.
- Verify the complete paper specification. Record the mill and grade, batch, gsm, measured caliper, grain direction, moisture or conditioning history, and surface treatments.
- Review the converting setup. Compare the crease rule, channel, make-ready, pressure, alignment, and folding sequence with the finished material—not only the unprinted base sheet.
- Run controlled comparisons. Useful A/B trials include the same stock with a revised crease, the same structure in an alternative paper grade, conditioned versus overly dry samples, and unprinted versus fully finished stock.
- Test the finished bag in use. Open it as a customer would, load it with the intended products, and evaluate the handles, seams, gussets, and bottom together. Agree the acceptance method before mass production.
What to Specify Before Mass Production
Give the supplier enough information to balance carrying performance with clean folding:
- finished bag width, height, gusset depth, and bottom construction;
- product dimensions, total packed weight, shape, and any hard or sharp contact points;
- rope or ribbon handle type, hole layout, patch, and reinforcement requirements;
- paper mill and grade where specified, gsm, measured caliper, grain direction, and relevant strength data;
- full print coverage, dark solids, coatings, varnish, foil, and lamination;
- expected storage, shipping, and use climate;
- an approved physical sample and a defined method for checking folds, corners, handles, seams, and load performance.
If a sample is already cracking, send clear photos of the bag before and after opening, the flat dieline if available, the paper and finishing specification, intended load, batch information, and details of when the defect appeared. Include these details when contacting SLD Packing. They give the supplier a practical basis for deciding whether the next trial should use a different paper, a revised crease, a structural adjustment, or different production conditions.